Not sure how to get started with posting your volunteer opportunities with Volunteer Success? It’s easy! Follow these steps to create or edit your volunteer opportunities. We recommend creating one posting per opportunity or role for better promotion and to increase the chance of finding that perfect volunteer!
Log into your account and navigate to your dashboard where you will see two options to add an opportunity.

From this page you can create a new volunteer opportunity by clicking on the blue Add Opportunity button or by clicking Add New Opportunity on the left-hand side menu. Doing so will bring you to the About the Opportunity page.
 The first time you set up your opportunity you will need to go through each of the tabs at the top (About the Opportunity, About the Volunteer, Interest in Opportunity and Preview & Publish). While not every field is mandatory, we recommend filling out as many of the fields as you can, to give volunteers a good picture of what they will be doing.
On the About Opportunity tab, you can duplicate a previous opportunity or simply create a new one. The following fields are mandatory:
- Opportunity Role (title) - see 2 in image above
- Number of Volunteers required - see 3
- Summary - see 4
- Description - see 5
- Location - see 7
In the Summary field describe the impact or difference this role will make to your clients, your mission or the community. Volunteers are highly motivated by making a difference, so spell it out for them right at the top. This summary will show up in the search results page and will repeat in the full view.
The Description should include EVERYTHING the volunteer needs to know about what is expected, including tasks/responsibilities, qualifications and benefits of volunteering in this capacity for your organization.
We recommend adding tags to help volunteers find your opportunity more readily in the search bar. What are the keywords that you associate with your opportunity? You can see a list of already added tags in the pull down or you can create your own. Need more info on tags? Check out this article on Writing Effective Tags for your Opportunity.

Location of Opportunity- you have three options for categorizing the location of your opportunity:
- Virtual Opportunity - use this button if the volunteer will be fully working from home. Adding a city and province in the address section can help if you prefer your volunteers to live in your local area.
- In-Person, Not On-Site is best suited for roles where the volunteers are in the community, either performing as drivers or visiting clients in their homes or in the community. Include the city and province so that volunteers know what area or community is being covered.
- On-Site, Specific Location is for those opportunities where volunteers are coming you to your main location or to an event location. Provide street address, city, province and postal code.
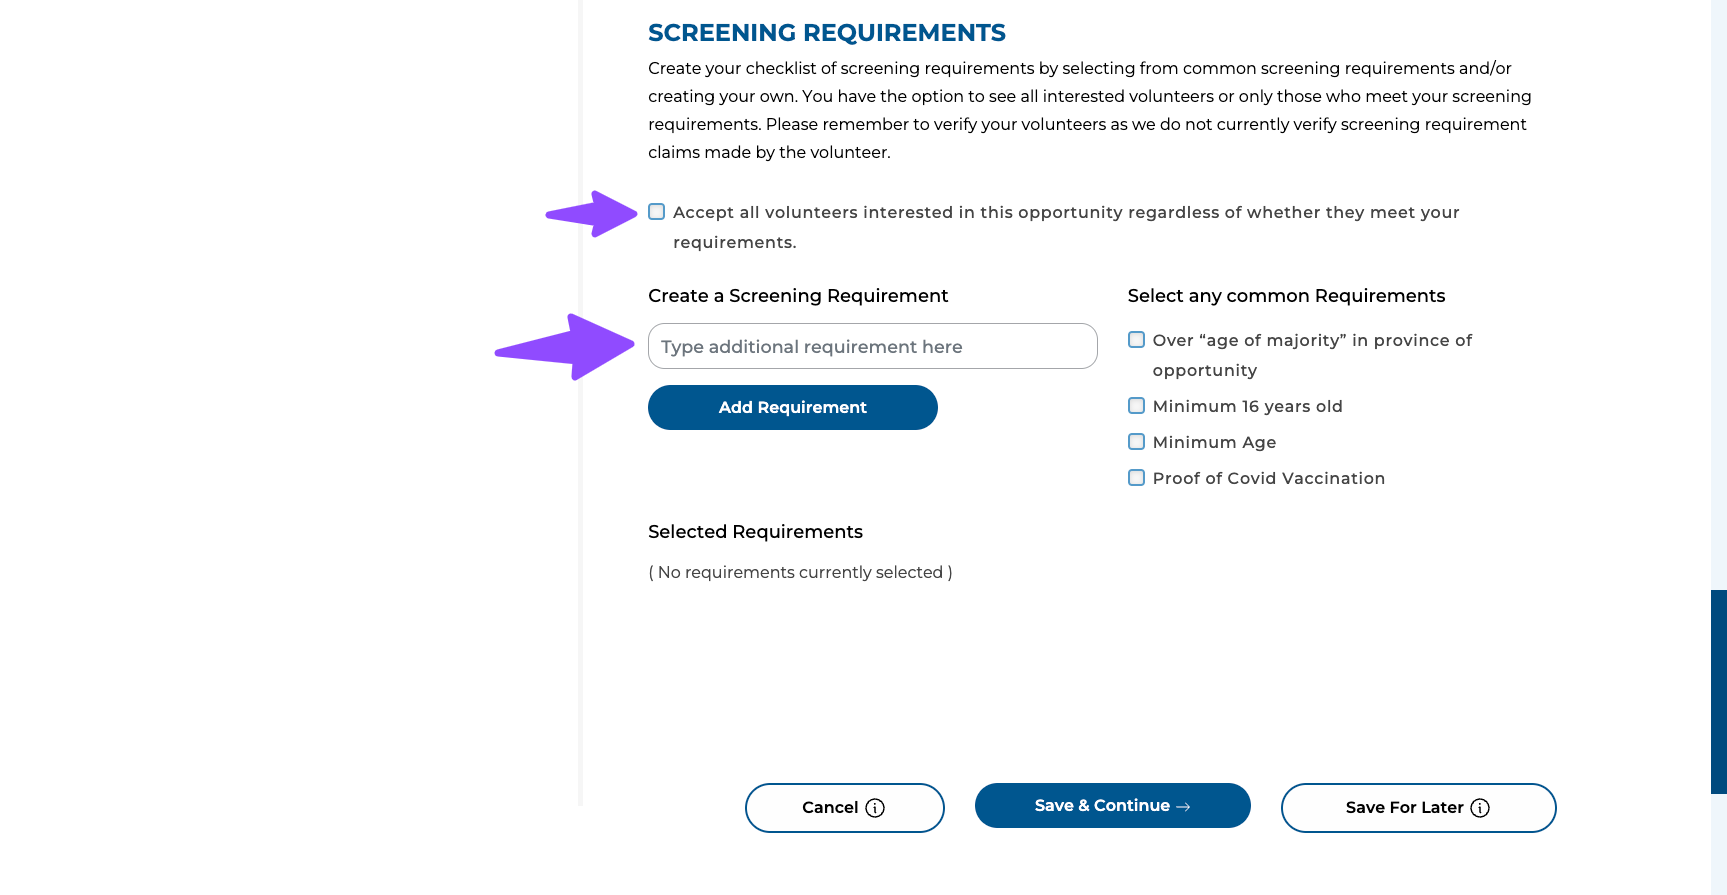
Screening Requirements - use this section to let prospective volunteers know what your eligibility requirements are. We’ve created some common ones such as minimum age and proof of COVID vaccination. We encourage you to add whatever additional screening measures you use, such as resume, work samples, police records check, references, certification, designation, driver’s license and insurance. Simply type your requirement into the box and then click on the blue Add Requirement button.
At the bottom of this page you can either click on the blue Save and Continue or the Save for Later button to return to your work later. Clicking on Save and Continue takes you to the About the Volunteer page.
 The About the Volunteer tab gives you some more options to fully detail your expectations so that volunteers can find a good fit. On this tab you can select:
- Whether the role is ongoing or an event/pop-up
- If the role is an event/pop-up, you will see options to provide shift and location information
- If the role is ongoing, you can select how soon the role is required and specific days of the week if applicable
- Skills and Experience that you are looking for - as many as you want
- Types of Volunteers - includes options such as Individual, Group, Corporate, High School plus more
- Assign to Team if you have multiple sites and departments
The next image shows you options if you select event/pop-up.

Again, at the bottom of this page you can either click on the blue Save and Continue or the Save for Later button to return to your work later. Clicking on Save and Continue takes you to the Interest in Opportunity tab.
 On the Interest in Opportunity tab, you can customize the message that volunteers receive when they click on their I’m Interested button on your opportunity.
Do you have a link to an online application form on your own website? You can add it here to the Link to Form field. This link will show up once the volunteer clicks on “I’m Interested” making it super easy to start the application process on your end.
Volunteers can also save a list of their favourite opportunities by adding it to their Watchlist. If you want to know when volunteers are adding your opportunity to their Watchlist you can click here to get notified by email. Note that you will not be able to see who it was that added you to their Watchlist until they actually click on I’m interested. It's still a great way to know if your opportunity is getting attention.
Finally, add in your Publishing Dates so that they expire when you want them to. Your opportunity will become unpublished after that end date so that we aren’t promoting stale or filled opportunities for you. If you want to unpublish your posting before the publishing end date because you’ve found a great volunteer, simply change the date to today. Or leave your opportunity unpublished by not clicking on the Preview and Publish button.
Finally, you can click on Preview and Publish at the bottom and you will get to your Preview page as the image below shows.
 Review your opportunity to make sure it looks right and if so, you are ready to click on the blue Publish at the top or very bottom of this page. See something wrong? Click on Back at the bottom, Edit at the top or just click on one of the tabs along the top.
Important: make sure you click on Publish, otherwise your opportunity will remain in draft form and not publicly visible.
After you have published your opportunity, you will end up on your Manage Opportunities page.
 Here you can see all of your opportunities along with titles, publishing dates, whether the opportunity is on-going or an event and whether the opportunity is completed or not. You can delete or edit opportunities as required. Editing your opportunities is the same process as creating them. From this page you can also add a new opportunity by clicking on Add New Opportunity.
Important: make sure you see a date under Publish Date. If not, your opportunity is still in draft and not publicly visible. Click Edit to open, click on the Preview & Publish tab and click on Publish. You may need to re-enter your publishing dates but don't forget the final Publish button!
And that’s all there is to it! Happy recruiting and let us know if you have any other questions. We’re here to help you fill your volunteer opportunities. Contact us at support@volunteersuccess.com

